|
M
11/2/09
|
HW due: Read §4.6; write the PBT Mastery Quiz (OK to write
answers directly on the quiz).
Below is last Friday’s puzzle, redrawn to scale. However, note that being
able to see the diagram drawn to scale may give you an unfair advantage. You
need to be able to apply PBT even when the segments and angles are all
“cattywampus.”

Answers:

|
|
|
T
11/3/09
|
HW due: Write §4.5 #1, 2, 4; §4.6 #6, 8. If time
permits, begin working on the review problems on pp. 206-209 #1-22 all.
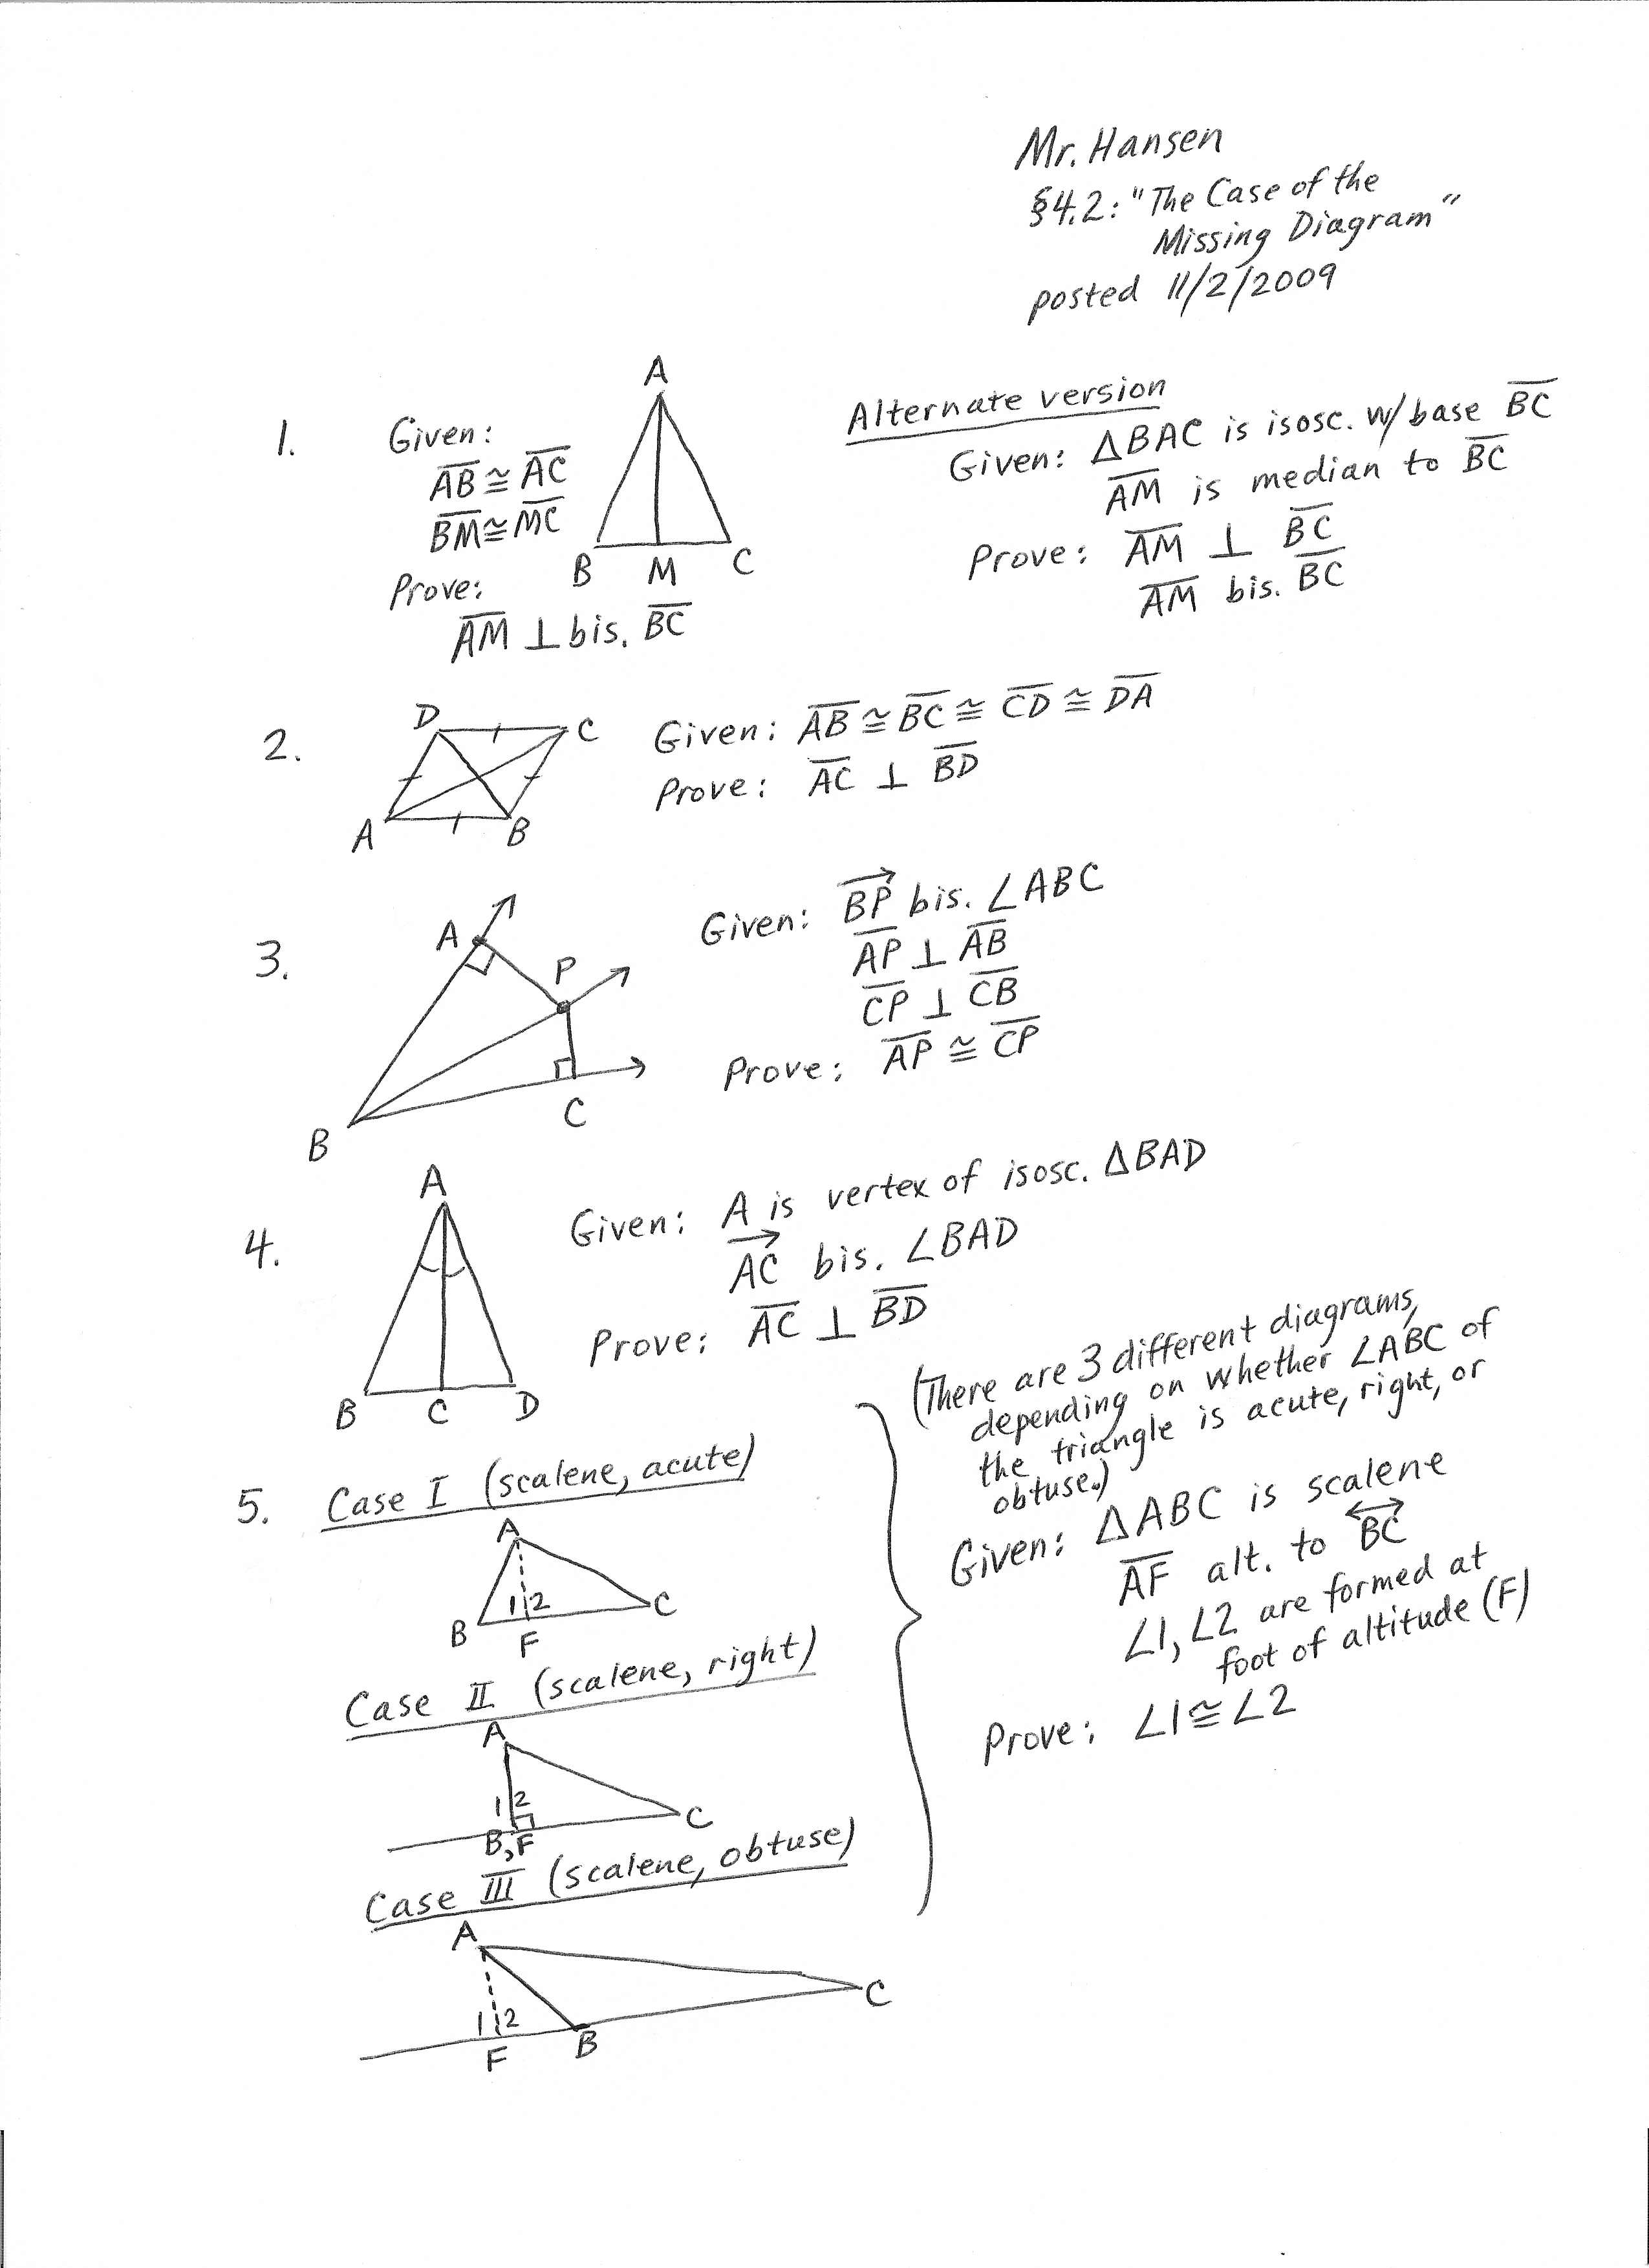
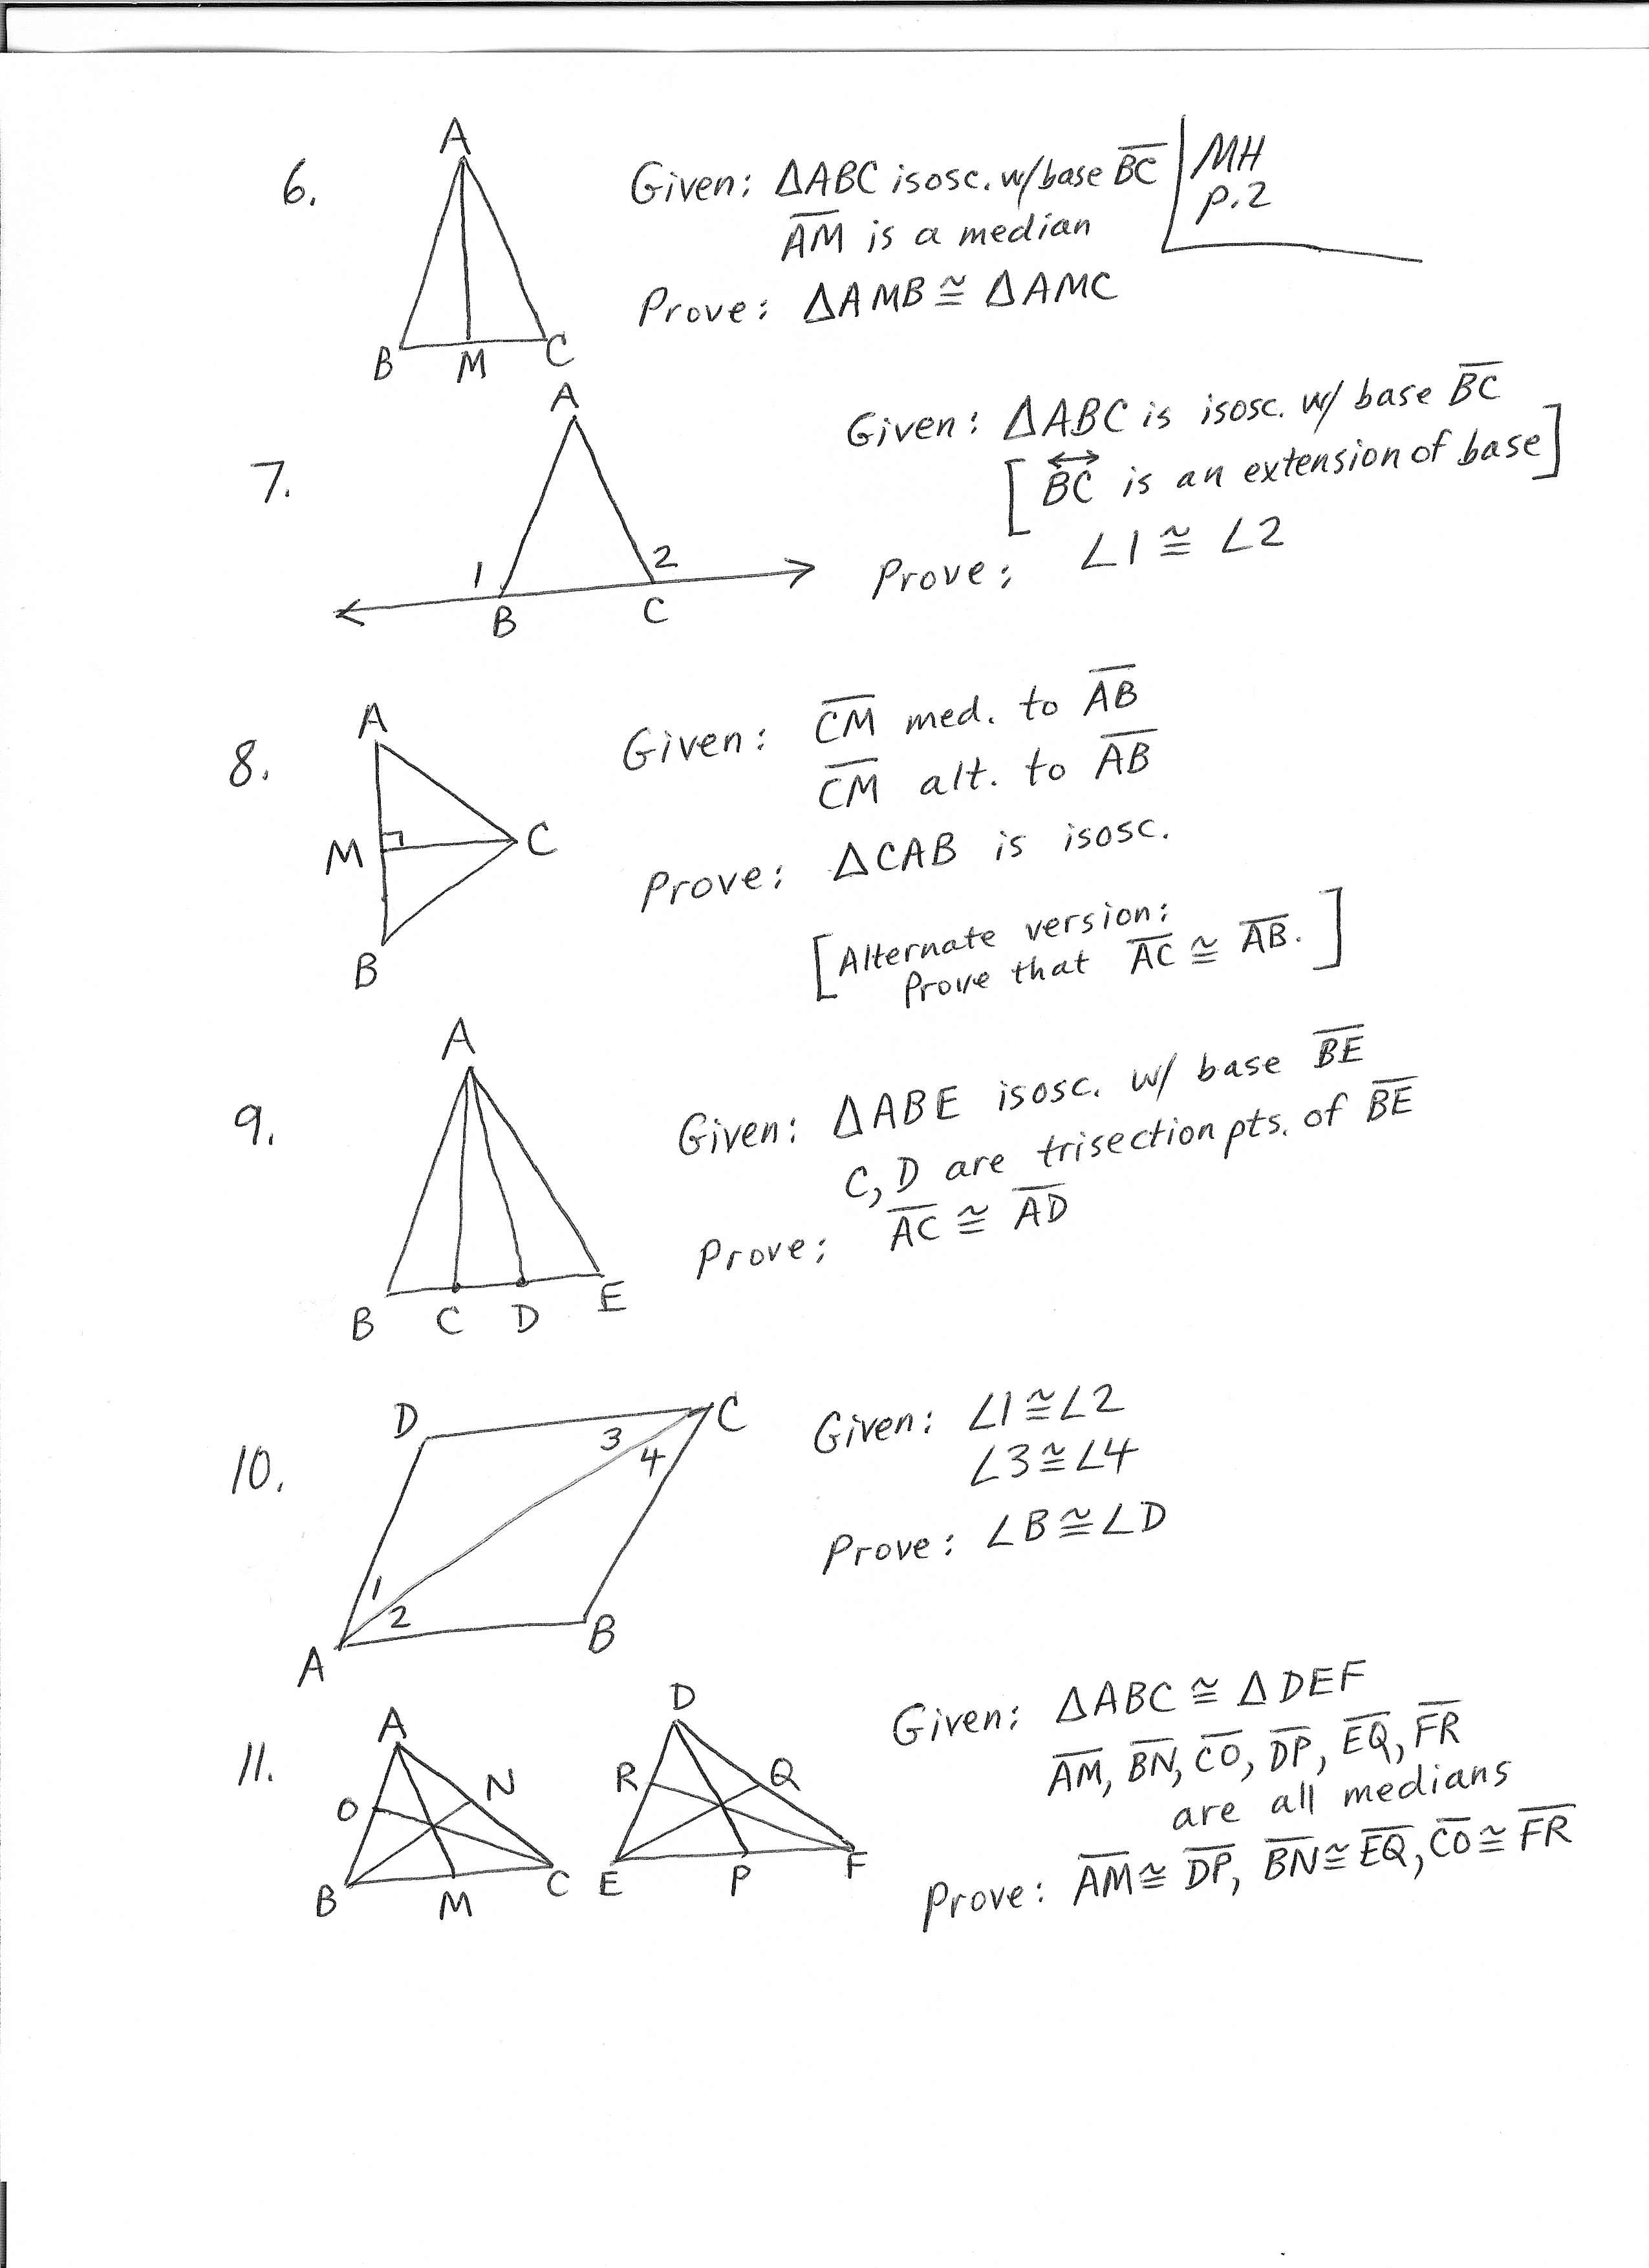
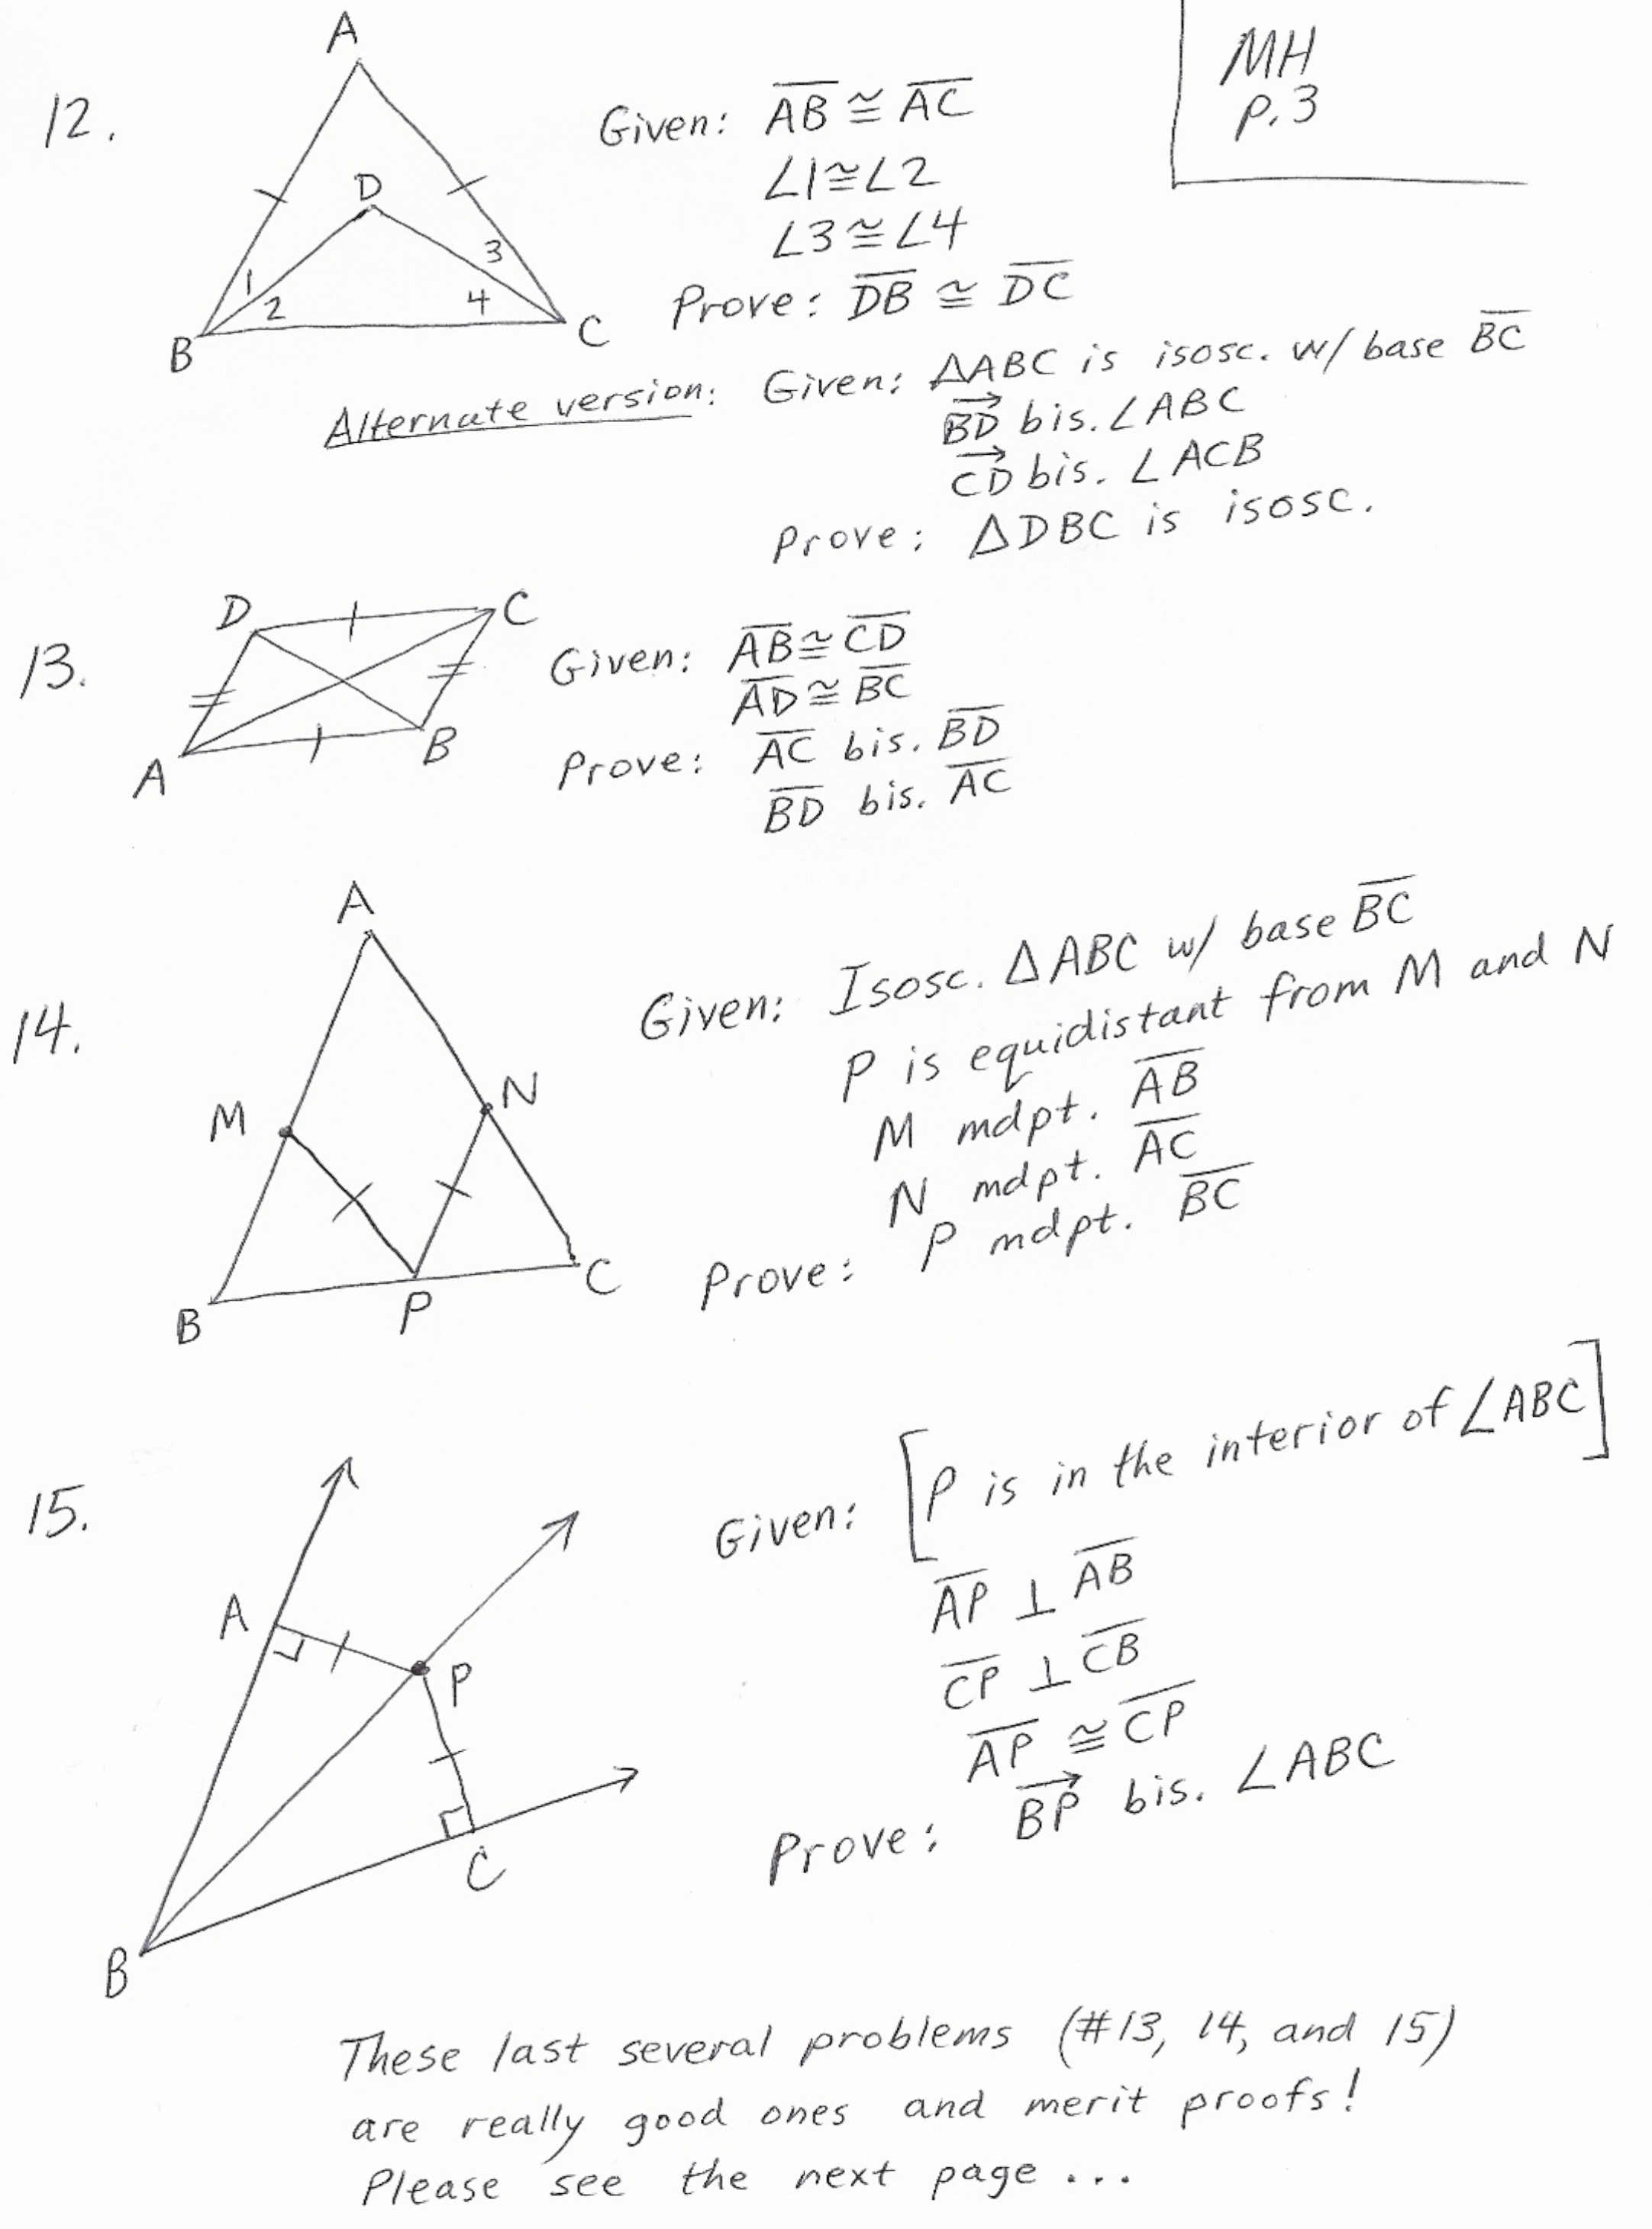
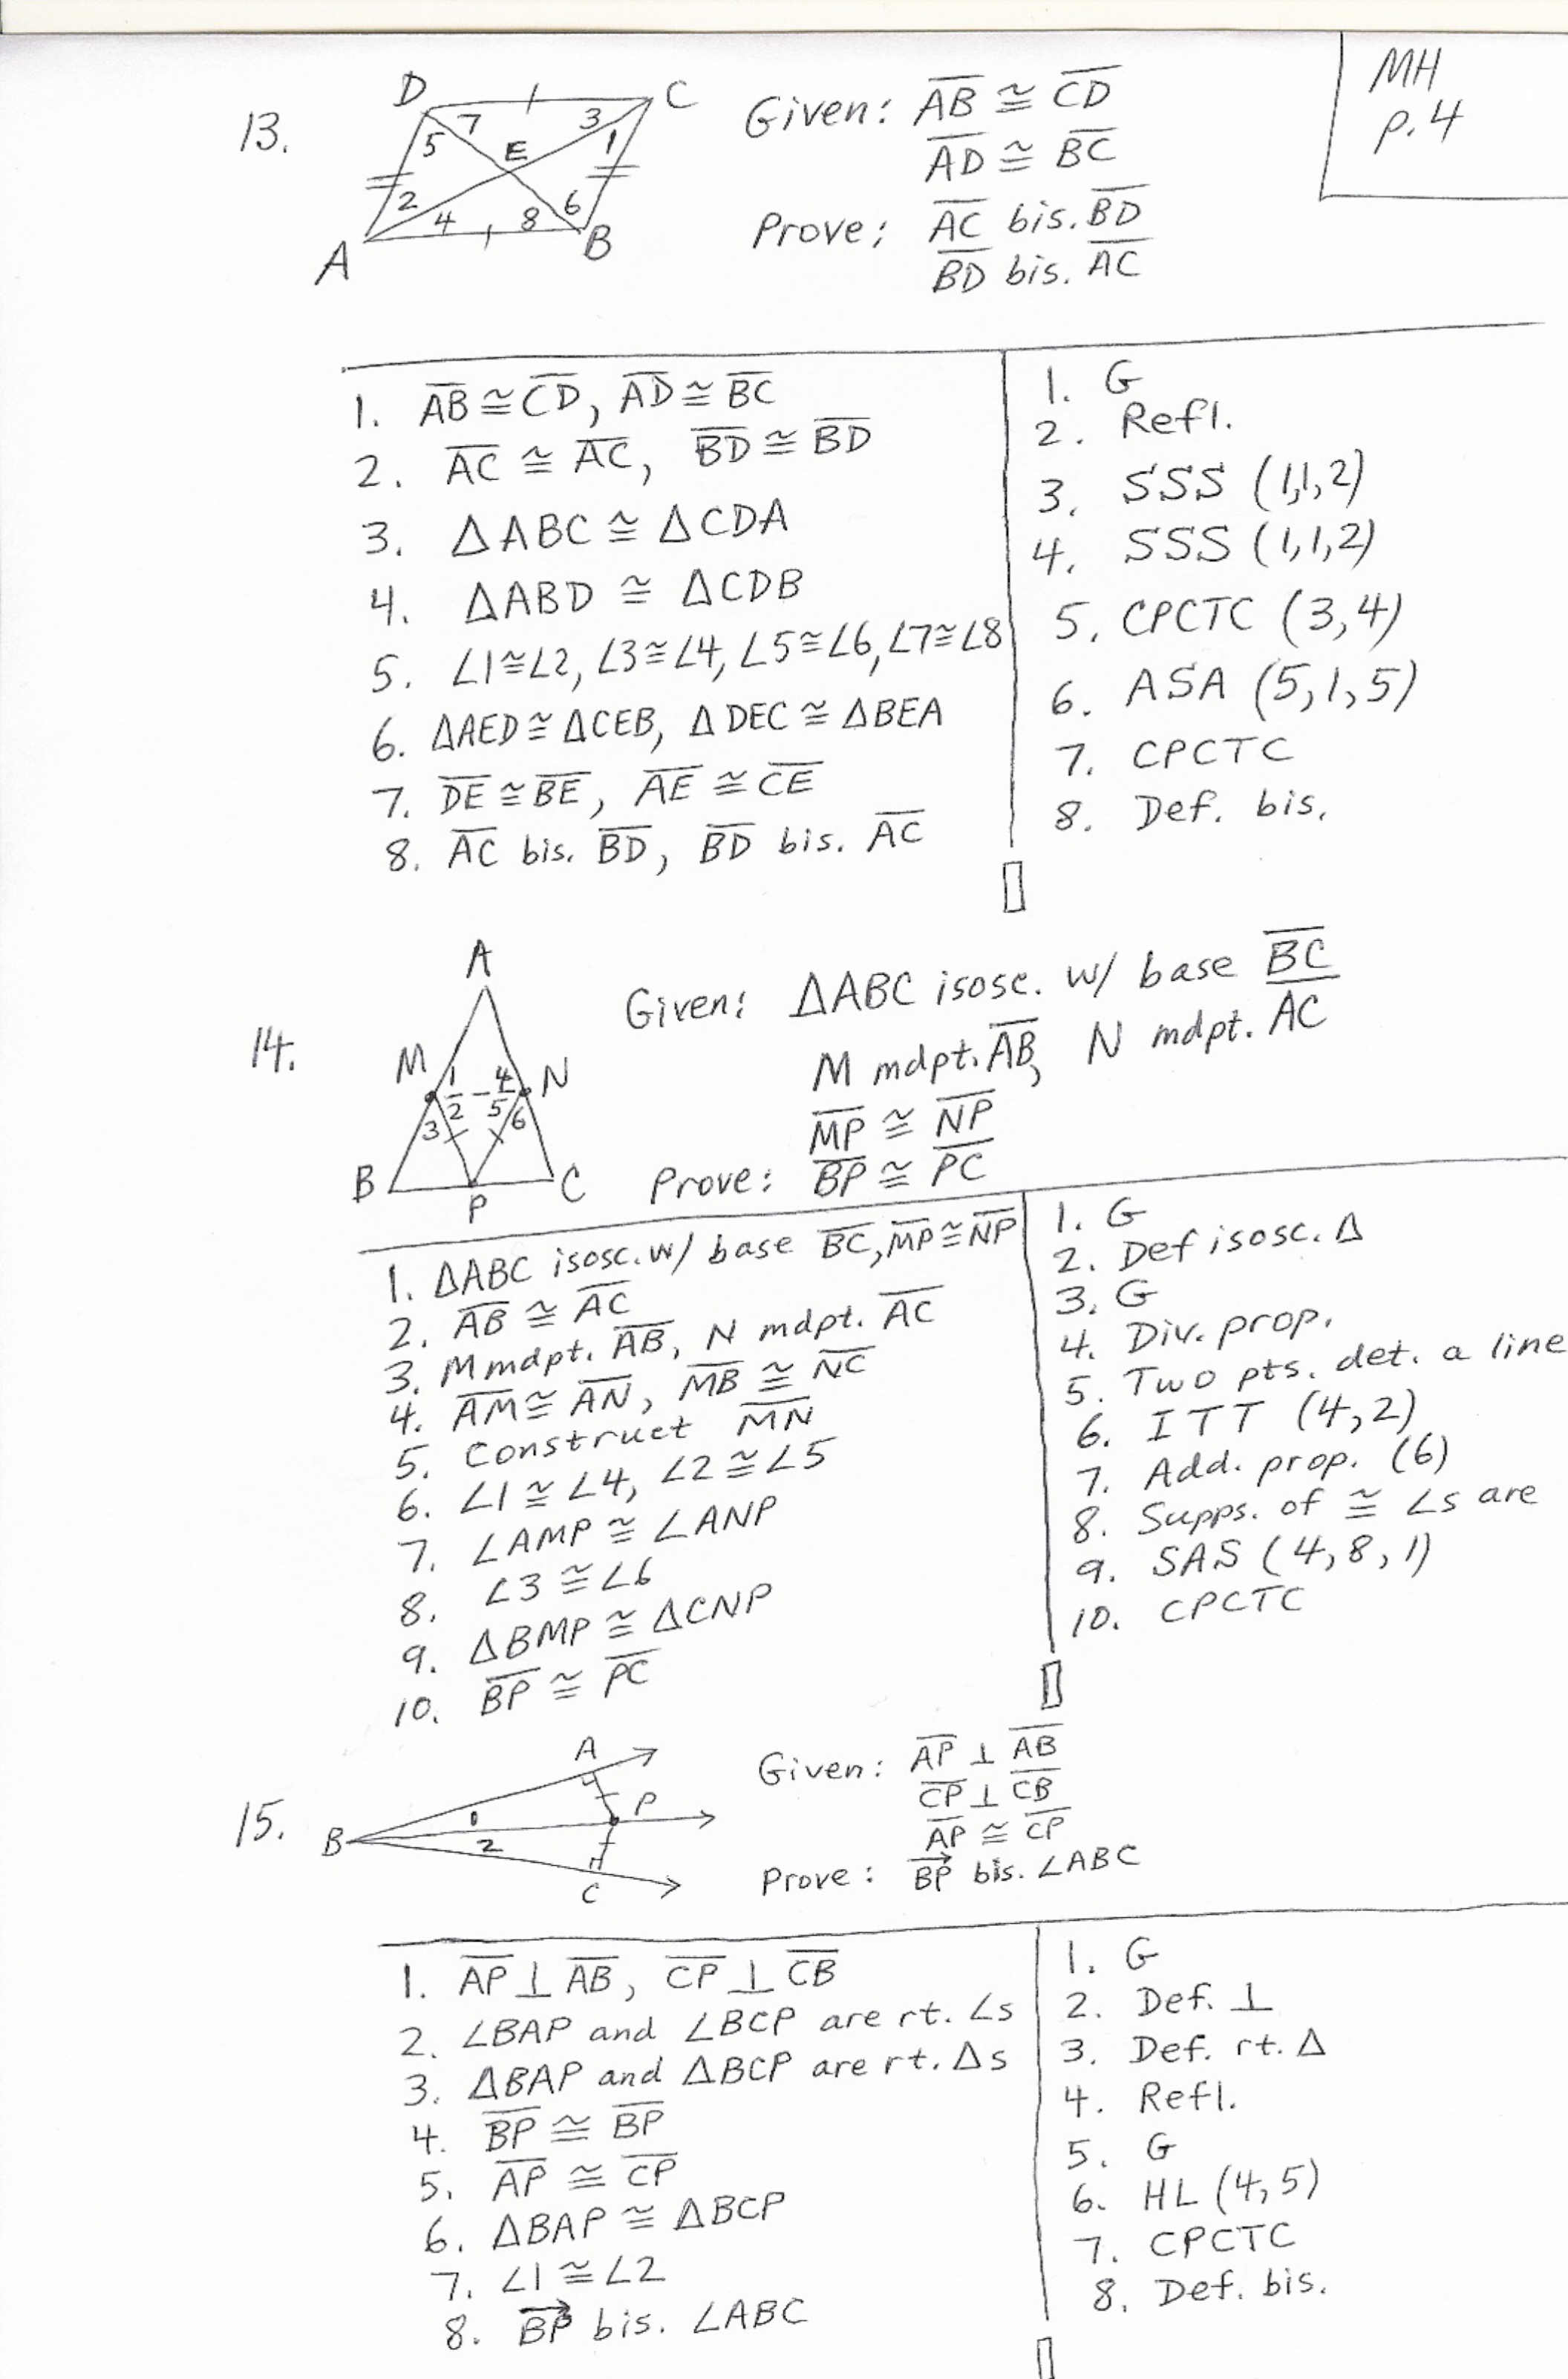
I would also like you to check all 15 of your §4.2 answers from last week: #1-5, #6-11, #12-15, and proofs for #13-15. The final
page (proofs for #13-15) is optional, since you were required to furnish only
the setups, not the actual proofs. However, the proofs are interesting, and
you may learn something by looking at them.
|
|
|
W
11/4/09
|
Test (100
pts.) through Chapter 4. Suggested
review problems are pp. 206-209 #1-22 all. After you have tried them, you may
wish to check the answer keys below:
#1,
2
#3,
4
#5,
6, 7(start)
#7(contd.),
8, 9
#10,
11, 12(start)
#12(contd.),
13, 14
#15,
16, 17
#18,
19, 20
#21(start)
#21(contd.),
22
#22(contd.)
|
|
|
Th
11/5/09
|
HW due: Complete your PBT Mastery Quiz to perfection.
This will be collected. Copies were distributed at the end of yesterday’s
test. (There was originally going to be an additional assignment, but it was
not posted in time.)
|
|
|
M
11/9/09
|
HW due: Read §5.1 and Mr. Hansen’s Umbrella Problem; write §5.1
#3, 10, 12. Everyone still needs to redo the PBT Mastery Quiz to perfection,
even those who achieved mastery toward the end of class on Friday.
|
|
|
T
11/10/09
|
HW due: Read §5.2; write §5.2 #1-5 all.
Hint: For #4, you may wish to
extend lines PQ, RS, and QS to that you can see the lines cut by a
transversal. Similarly, in #5, you may wish to extend lines BC, DE, and AE.
|
|
|
W
11/11/09
|
HW due: Read §§5.3 and 5.4; write §5.2 #13, 17, §5.3
#1, 3, 7, and the 5 x 5 puzzle.
|
|
|
Th
11/12/09
|
HW due: Attend Bo Cox session at school; sleep.
Question to ponder (will not be collected, but you can think about this as
you fall asleep): Is it possible for a trapezoid to be a kite?
Remember, a trapezoid is defined to be a quadrilateral with exactly one pair
of opposite sides parallel. A kite can be defined as a quadrilateral that has
an aabb pattern for sides. (A
rhombus is a kite, as is a square, since both satisfy the aabb condition. However, most kites
have two different values for a and
b.)
|
|
|
F
11/13/09
|
HW due: Read §5.5; write §5.4 #7, 8, 15, and prove
that no kites are trapezoids. Hint:
For the final proof, use a proof by contradiction. In other words, show that
a figure that is both a kite and a trapezoid is impossible.
|
|
|
M
11/16/09
|
HW due: Read §5.6; write §5.5 #2 and make flash
cards for the properties on pp. 241-242. You need to be thoroughly familiar
with all of these. For example, here is how I would make 5 flash cards for
the kite properties (top of p. 242):
1. A kite, by definition, has ___________________________ .
2. A kite always has __________________ diagonals.
3. One diagonal of a kite is _____________________________ .
4. One diagonal of a kite does what to angles? _________________________
5. In a kite, at least ________________________ .
Answers:
1. sides that follow an “aabb” pattern
2. perpendicular
3. the perpendicular bisector of the other (by PBT)
4. bisects an opposite pair of angles (the other pair may or may not be
bisected)
5. one pair of opposite angles are congruent (the other pair may or may not
be congruent)
If you wish to work with one or two friends in order to reduce the amount of
writing, that is fine. However, each of you should practice with a full set
of flash cards.
If your supply of index cards is extremely limited, you may put several
properties on each card. Note that this reduces the educational effectiveness
somewhat, since the cards cannot be fully shuffled unless you have one
property per card.
Note: If you do not have access to
index cards, you can make flash cards by cutting up ordinary sheets of paper.
However, cards are definitely easier to work with.
|
|
|
T
11/17/09
|
HW due: Bring your flash cards to class for grading
(and also to help you with day 2 of the A/S/N quadrilateral competition), and
fill out the Polygon Feature Chart.
You may discuss individual cells with friends, but not the entire chart.
Also, no copying!
|
|
|
W
11/18/09
|
HW due: Read the crook
problem in the 11/9/2007 calendar entry and all of §5.7; write #25 on p.
267, §5.3 #10, and §5.6 #1, 3, 4. Also, your Polygon Feature Chart will be
spot-checked. You may be asked to defend any entry in the chart (i.e., give a
quick reason or a quick proof). Remember, A
means something you should be able to prove, and N means something you should be able to disprove. S means you should be able to describe
(or sketch) both an example and a counterexample.
|
|
|
Th
11/19/09
|
HW due: §5.7 #2, 6, 8, 10, 11, 13; pp. 264-267 #1-11
all, 16, 18, 19, 21, 25, 26. Do as many of the problems as time allows, in
the order shown. I also strongly recommend that you compare your Polygon Feature Chart with the answer key and make sure you learn
from all of your mistakes.
|
|
|
F
11/20/09
|
HW due: Finish up the assignment from yesterday.
|
|
|
M
11/23/09
|
HW due: Write p. 267 #23. Work hard! Don’t give up!
Then carefully correct your answers to §5.7
#8 and p. 267 #23. Learn as much as
you can by comparing your work against the posted versions. No shortcuts, no
excuses.
You may have to start over on a clean sheet of paper. Make sure that you can
eventually do both problems without notes, from scratch. (Otherwise, you are
merely fooling yourself and will be unable to do similar problems when they
pop up on tests or quizzes.)
In class: Discussion/recap of recent material, followed by guest speaker, Mr.
Joseph Morris (STA ’62) from MITRE Corporation.
|
|
|
T
11/24/09
|
HW due: Please download Google Sketchup from the
Google website and start playing around with its capabilities. For example,
load the model of two intersecting spheres and see if you can figure out how
to view it from different angles. No additional written work is due for now.
|
|
|
|
Thanksgiving break.
|
|
|
M
11/30/09
|
HW due:
1. Download Google Sketchup and start playing around with its capabilities.
The Sydney Harbor Bridge model is a favorite of mine. If you feel really inspired,
you could start building a model of Marriott Hall to post on Google Earth
(major bonus points for that!).
2. Review your four basic construction techniques: perpendicular
bisection of a segment, bisection of an angle,
dropping a
perpendicular, erecting a
perpendicular. You may be quizzed on any of these. I will furnish a
compass in class, but you will probably want to buy a cheap Office Depot or
Wal-Mart compass to use at home. You can also use “compass fingers” as shown
in video #2B.
3. Finish the exercise we began in class last Tuesday. Only two students
managed to get all the way to the end before time ran out. Put your name on
your paper. Neatness counts. If you need to start over on a fresh sheet of
paper, that is fine. Here are the steps:
- Use your straightedge to make
 (scalene, ugly,
nothing special about it). (scalene, ugly,
nothing special about it).
- Drop altitude from A to
 . Note:
Extend if necessary so
that you can make the “smile” that intersects in two places. . Note:
Extend if necessary so
that you can make the “smile” that intersects in two places.
- Drop altitude from B to
 . .
- [Optional.] Drop altitude from D to
 . This step is not mathematically necessary, but it is
useful as a cross-check. . This step is not mathematically necessary, but it is
useful as a cross-check.
- Mark point O (orthocenter) at intersection of
altitudes.
- Construct perpendicular bisector of .
- Construct perpendicular bisector of .
- [Optional.] Construct perpendicular bisector of
. This step is not mathematically necessary, but it is
useful as a cross-check.
- Mark point C (circumcenter) at intersection of
perpendicular bisectors.
- [Optional.] Verify that C is correct by making
a circle centered at C and passing through A, B, and D.
- Construct midpoint of
 , and mark that midpoint as N (nine-point center). , and mark that midpoint as N (nine-point center).
- Verify that N is correct by making a circle
centered at N and passing through the midpoint of each side of as well as
through the feet of the three altitudes.
- [Optional for bonus.] Mark the three Euler points as
E1, E2, and E3. Remember, these are the
midpoints of the segments connecting each vertex to the orthocenter, and
if you have made an accurate diagram, the nine-point circle should pass
through all three Euler points.
|
|